I’ve said the words many times.
I’ve heard many-a-person say the same.
“I’m A Planner.”
Well, I think everyone is a planner… to different degrees. Sometimes when I talk about my travel and event photography work, I see a lot of gaping mouths and a lot of ‘wow’ comments; the same as when I watch a PGA golfer take a tee shot, watch a spray paint artist bring an image to life, see a new piece of technology that will make life easier for millions… Even though I own golf clubs, I’m not a PGA-level golfer. I have a few cans of spray paint, but I’m no spray paint artist. I benefit from technology every day but I don’t design it… but I do have a mix of skills that allows me to put a program like this together quickly and on budget.
I want to walk you through the steps I took between getting the call and having locked down plans. This is the way I’ve developed. It’s not everyone’s way, but it’s the system I’ve developed and hopefully can help you be a better planner – Step By Step.
Step 1: Receiving the Call!
I covered some of this in my post about receiving the call… the initial ask basically asked for ‘photography in 7 cities throughout July, plus videography and editing in the first city – Houston – less than a month from now.’ At that time, my plan was to shoot stills at all events but Houston, where I’d bring on a local still photographer and shoot video myself. This is where it starts.

Step 2: Check the dates!
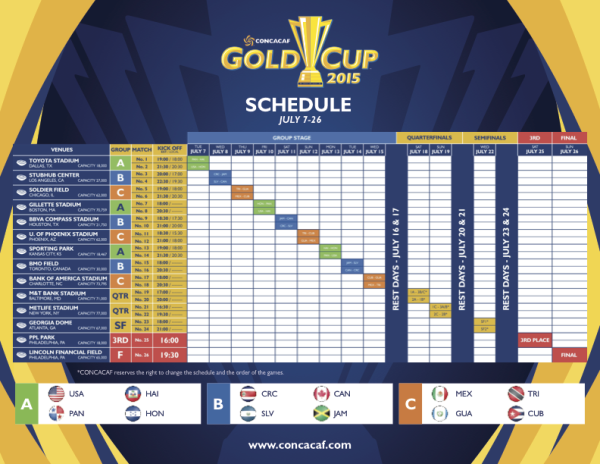
The next thing I do, before replying to the client, is check the dates against my calendar. The original email listed dates in market, but there wasn’t enough information for me to be able to confirm yet. Looking at the CONCACAF Website, I could find all the dates, times and locations I needed for when I’d be working on-site, then looked at travel and editing days. How far is the venue from the airport? Would I need to fly in a day early or are there flight options to fly in day-of? What’s the ground transportation situation? Hotel options? Could I make the commitment?
Yes. Good. Onto step 3.
Step 3: Make my own calendar!
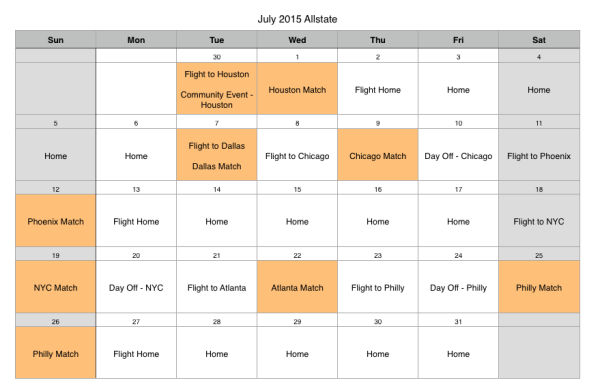
Using Apple Numbers, I created an initial calendar that included all of the important dates. Shooting days, travel days, etc. I find it really helpful to have all of this laid out in a clean look with no distractions (such as other personal calendar items). This gives me something to create my budget and, as I get later in the process, gives me a quick reference. I also share this with the client, so we’re all on the same page with expectations, and they know what my plans are. The critical days are always highlighted.
Armed with that data, I’m able to move to step 3.
Step 3: Soft Budget!
No joke. This is where the rubber hits the road. When budgeting for something like this, there are several pieces that need attention:
- Shooting Days. These are the on-site days – the days with a camera in my hand. My fees for still photography include (most) equipment and (some) editing, and my client already knows this. In this case the client asked for a second shooter as well for one of the events, so that gets included in the budget too.
- Travel Days. These are days spent getting to and from the events; days that I can’t commit to anything else, so it’s a billable day to the client. Not the same as a shooting day, but time is time.
- Post Production. Though the day rate for still shooting includes editing (and delivery of photos within 24 hours of the end of the event), video is a completely different animal. Video can take up a TON of time. The shooting rate for video includes the review of the footage shot, but doesn’t include editing (or music licensing, or any of the many costs that can add up with video). When tasked with video I’ll include a certain number of hours of editing into the budget (usually 3-5) but the client may have changes, then more changes, then more changes, then want to change their mind completely and want to start over once I get to a point of no return. A package price on video is completely unrealistic. Tho, to make sure I stay on budget, I push for a TON of info and creative direction/communication from the client. The more info I receive from them before we start, the smoother, closer to budget, expectations fulfilled end-product we get.
- Travel Expenses. This one can be broken down even further:
- Flights – I’m in Seattle and the work is not. Gotta get there. I use Kayak.com for most of my flight research, then link through to book with the airlines. This is the most finicky of all items to budget for, and the only reason I press my clients on time. I don’t like using a hard-sell (and have dropped vendors that try to hard-sell me), but flight charges can swing wildly; just because I check costs today, there could be a 50% change tomorrow which could blow the whole budget. So, whenever I submit a budget to a client, I always add some fluff and tell the client that number could change.
- Hotels – I use Kayak for the research here too (sometimes Expedia or Hotels.com), but always book directly through the hotel. Most hotels won’t give you loyalty program points for stays booked through 3rd party vendors like that, and I want to make sure I get those points. I usually budget $175/night. Hotels in some places will be more, and others will be less, but this is the average I shoot for (including tax and any other hotel fees like parking, internet, etc). Those fees can quickly add up, so really I’m looking at $100-125/night hotels. That usually puts me in Hampton Inns, Fairfield Inns and Holiday Inn Expresses. These offer many free amenities (like breakfast and a business center with a printer), which allow me a little fluff room for emergencies in the budget.
Side note: For security reasons, I do most of my computing on my laptop. If I need to print something, I’ll print as a PDF and email it to myself, then use the business center printer to print, or sometimes email to the hotel front desk and they print it for me. Not too much trouble; usually only 1-2 pages anyway of things like schedules, shot lists, etc).
- Ground Transportation – I need to get to the airport (including parking if I drive myself), from the airport to the hotel, the hotel to the venue and back again. I budget $50-75+/day for this, depending on the city I’m going to and the where the venue is.
- Per Diem. This is food and other personal expenses while traveling (including sun screen, etc).
- Management/Production. Time has value, and a project like this will have a lot of coordination. Emails, phone calls, meetings, planning, testing… all of that takes time, and all of that is directly attributable to the project, so all of it is billable. I include these costs in my shooting day fees, so the client doesn’t see this line item, but it’s important to account for them in your own time budgeting.
- Emergency Reserve/Entertainment. Another line item that isn’t shown to the client, but is crucial. Things happen. Cameras and lenses can break, batteries fail, memory cards fail, flights get cancelled, hotels over-book… It’s the things you don’t plan for that happen at the most inopportune moments, and I look like an idiot if I have to call my client and tell them I can’t fulfill my end of the deal because I didn’t plan for something. This is also built into the day rate for shooting. Back-up, and back-ups to the back-ups. And plan. And it’s nice if you take your client out for drinks or dinner.
After doing all of my cost and budgeting, pulling together a calendar, preliminary research into the cost for the second shooter, etc, I’m ready to fold everything together into a package that gets presented to the client. I got the first email at 1:54pm on June 2 – a couple of follow-up questions – and I had my preliminary plan and budget to the client by 3:01pm the same day. 1 hour and 7 minutes, while also trying to move out of my house because I was selling it. Being able to pull everything together that quickly takes time and experience, and then shows that you know what you’re doing, which the client likes to see.
Step 4: Modifications!
Some of the follow-up questions mentioned above were me reading between the lines. The client knows what they want, but they speak a different language than I do (why I’m the photographer and they’re not). After confirming the details that I saw then sending the initial plan, the client had some updates. The schedule changed slightly. The opening event (a community event in Houston) had shifted a day earlier, and they were now asking to add video to all of the events – not just in Houston.
Yes, these will effect the budget.
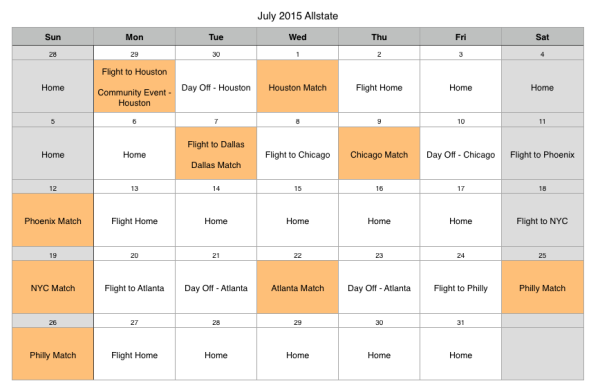
Luckily, because of the planning I had already done, many of the budget numbers I had developed were scalable. After making the appropriate adjustments, the updated plan and budget were sent to the client. I also had to firm up details on my end. For example, hotels in Atlanta are cheaper than in Philadelphia and New York, so we’ll plan to spend time off in ATL instead of NYC or PHL.
Step 5: Negotiations!
The client will always (always) look for ways to save on budget. Sometimes I can accommodate and sometimes I can’t. Sometimes they want more than I can give; sometimes it’s easy to say ‘I can reduce this cost but that will come with this reduction in value.’ It’s a conversation – a give and take. My client came to me, and my product has value (and my business has financial needs), but I also respect that they have a budget, too. Respect and communication, and it all worked out. Shake hands!
Step 6: Make it happen!
OK – almost there! Now you mean I actually have to do it? No problem. The plans are in place and the budget is set – time to book everything and lock it all up, then go have fun making great photos for the client! There are a few other housekeeping items on my end before we get on an airplane:
- Share the calendar. The client needs to know the important bits, but not everything. I created a Google Calendar that I shared with everyone internal that includes all of the flight, rental car, hotel, and shooting details. Confirmation numbers, seat assignments, call and strike times on site… all of the essential bits. This serves 2 purposes. First, it’s ‘teaching a man to fish’ – it’s easy to get bogged down with endless questions. If it’s all published, the internal team can reference everything as needed. Second, it’s a back-up. If the team can access it and an emergency comes up, I don’t need to worry about whether the people that need the info have it – it’s all out there. For the client, tho, I send an email that lists all of the arrival times and flight numbers. This is the stuff they really need to know. I’ll share anything else, but knowing when my team is on the ground is paramount.
- Prep the equipment. I’ll go into more detail in Part 3 of this series, but this includes test packs, equipment tests, data management, etc.
- Prep the info stream. I pre-load all of the cities I’ll be in into a weather app. I check (and re-check) that all the data in the calendar is correct. I set-up budget tracking. I put together all the contact info. I download apps for all the airlines I’ll be flying, hotels I’ll be staying in, cars I’ll be renting, etc – the things that make the process easier when I’m in front of their staff.
- Local knowledge. I research food and entertainment options, but more importantly I research supply houses locally in case there’s a last-minute need. If a camera goes down and I need to rent a back-up, where do I go? Looking into that is a lot easier before I get on the plane, instead of in the heat of the equipment malfunction while I’m on the field in a 40,000 person stadium.
OK – Go Time!
In Part 3 I’ll dig into the next level of planning – the equipment. What am I planning to take? How will I back-up everything as I go? How will my team capture both stills and video? Next time on the AShapiro Studios Blog!
